DOOM + DOOM II Accessibility Guide
By: Parker Wilhelm

Combining two classic id Software first-person shooters in one place, DOOM + DOOM II features both games with all previously included content, plus new enhancements and features!
On top of features like cross-platform online multiplayer, DOOM + DOOM II also includes updated accessibility and quality-of-life options for players. Players can adjust and re-adjust these settings to their liking anytime in-game in the Options menu, under Accessibility.
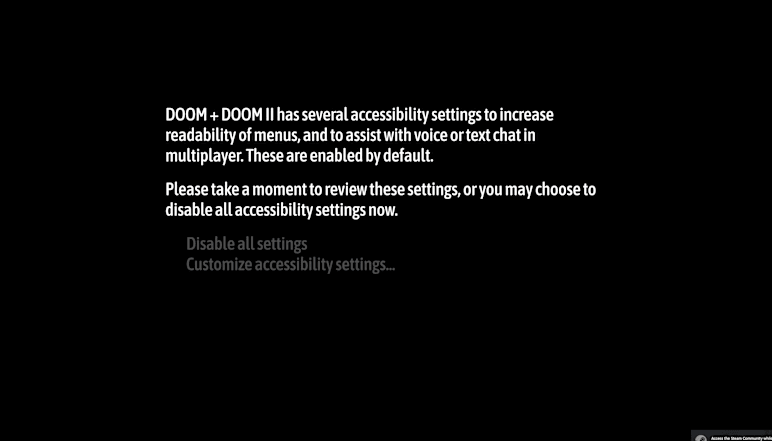
Accessibility Options Notification
After installing the game and running it for the first time, you will be presented with an Accessibility Options notification. DOOM + DOOM II has several accessibility settings to increase readability of menus, to assist with voice or text chat in multiplayer, and to enable or disable many of the screen flash effects.

Players can choose to enable any or all of these options in this menu. By choosing the Customize Accessibility Settings option, all accessibility options are set to the most accessible version by default. When choosing Disable All Settings, the game uses the standard default settings instead.
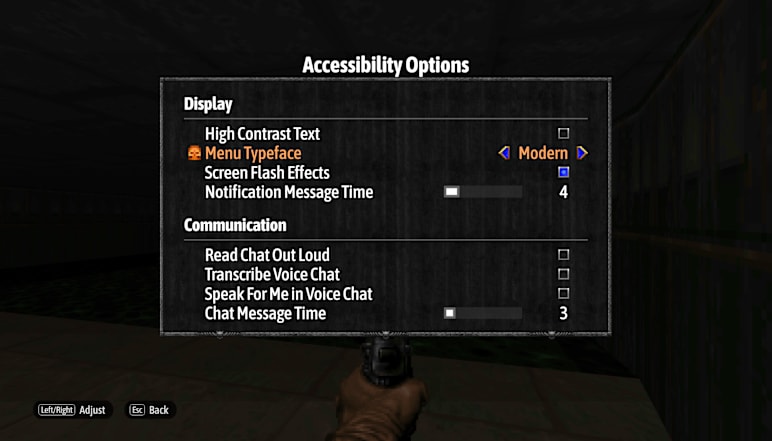
Accessibility Options
- High Contrast Text: Enable or disable high contrast text. When enabled, high contrast text will change the background behind text in the menu to a solid black background.
This will also replace the animated background with a static black background across many menu screens. (This is enabled by default when you choose Customize Accessibility Settings on the first launch menu.)

(High Contrast OFF)

(High Contrast ON)
- Menu Typeface: Choose between the Modern and Classic menu typeface.
The Modern menu typeface uses a large non-serif font that is less stylized, in mixed-case presentation (upper and lowercase lettering) and an easier to read color (white and orange).

The Classic menu typeface is the original typeface of the game. (This is set to Modern by default when you choose Customize Accessibility Settings on the first launch menu.)

- Screen Flash Effects (Full Screen Effects): When enabled (selected), this allows the full set of screen flash effects to be displayed. When disabled (not selected), many of the game’s screen flash effects are not displayed. This includes disabling effects such as blinking when invulnerability is about to end. Note that this may reduce the visibility of some types of elements or actions in the game by disabling the visual effects, and that not all screen effects are impacted by this setting. Show Screen Effects is enabled when you select “Disable All Settings” in the first launch menu. Screen Flash Effects are disabled (not displayed) by default when you select Customize Accessibility Settings on the first launch menu.
- Read Chat Out Loud: Enabling this option converts incoming multiplayer text chat into a synthesized voice. (This is enabled by default when you choose Customize Accessibility Settings on the first launch menu.)
- Transcribe Voice Chat: Enabling this option converts incoming voice chat into text in the multiplayer chat window. (This is enabled by default when you choose Customize Accessibility Settings on the first launch menu.)
- Speak For Me in Voice Chat: Enabling this option converts outgoing multiplayer text chat into a synthesized voice audible to other players in voice chat. (This is enabled by default when you choose Customize Accessibility Settings on the first launch menu.)
- Chat Message Time: Adjust the amount of time that the chat message is displayed (0 to 20).
Input Options
- Controller Bindings: Shows current controller bindings for gameplay, automap, and multiplayer Chat and Push to Talk can be remapped to other inputs.
- Mouse and Keyboard Bindings: Shows current mouse and keyboard bindings for gameplay, automap and multiplayer. Chat and Push to Talk can be remapped to other inputs. Default movement can be toggled between WASD, ESDF and Custom.
- Controller Button Prompts: Changes the type of symbols displayed for controller button prompts. Can change between showing various types of button prompt letters or symbols.
- Controller Vibration: Toggle on/off and adjust vibration intensity.
- Controller Sensitivity: Adjust the controller sensitivity.
- Advanced Controller Options: Enable or disable smoothing and acceleration for the controller. Adjust max turn acceleration, left stick deadzone and right stick deadzone.
- Mouse Smoothing: Adjust the mouse smoothing (Off, 2x, 3x, or 4x).
- Mouse Sensitivity: Adjust the mouse sensitivity.
Gameplay
- Always Run: Enable or disable running by default when moving.
- Crosshair Adjustments: Choose from seven style options, size (50% to 400%), alpha (impacts brightness), border, center dot, color (hue), saturation (greyscale to full color) and luminance (lower values are more black, higher values are more white).
- Auto Aim Crosshair Adjustments: Customize size, hue, saturation and luminance for the auto aim crosshair.
Multiplayer
Enable or disable settings for Crossplay, VOIP, Microphone and Push to Talk.
- Split Screen Direction: Set to horizontal or vertical split screen.
Sound
- Choose preferred soundtrack.
- Adjust Volume: For sound game sound effects, music and voice levels.
- Pitch Shift Sounds: Enable or disable pitch shifting for sounds.
Display
- Field of View: Adjust the FOV (between 50 and 120)
- View Bobbing: Adjust the camera view bobbing (0% to 100%).
- Screen Size: Adjusts the display of the viewable gameplay area and UI. (Choosing 11 will hide the UI bar at the bottom).
- Brightness: Adjust the game brightness (0 to 100%).
- Extra Lighting: Adjust the light level of the maps. Increase from 0% to 100% to improve visibility in dark areas of the game and increase view distance. Adjust from 0% (no extra lighting) to 100%.
- Automap line thickness: Adjust the line thickness for Automap (Auto to 8x).
DOOM + DOOM II is available now on Xbox One, Xbox Series X|S, Xbox Game Pass, PlayStation 4, PlayStation 5, Nintendo Switch and PC.
We’re sorry but you may not access this content. Please review our Privacy Policy


